Shoot From The Heart – 5 Photography Tips When Visiting Discovery Place Nature
Discovery Place Nature
Whether you’re a budding amateur or a seasoned professional, Discovery Place Nature is a unique photography location.
We’ve listed some of our fave ways to capture lifelong memories and local professional photographer, Erica Decker, helps us with some pro tips.
Throw Some Shade
Tick tock, consider the time of day you’re visiting the Museum. The best time to shoot outdoors is usually when the sun is not directly overhead – so think morning when the Museum opens or end of day/ early evening – remember the Museum is open late on Tuesdays!
Try incorporating the shadows and shapes the light creates, they can help you communicate emotion. How you feel about the image is just as evident as the technical aspects you used in a photograph.
PRO TIP: There is a nice canopy of trees in Fort Wild. Shooting in the shade allows you to capture even lighting. Watch out for bright sunspots that can sneak through the trees. They can be beautiful in your scene, but undesirable on faces.
Kids, Animals, Action!
Kids and photo opportunities have one thing in common… they don’t wait for you. When visiting the Museum have your phone or camera at the ready. To capture movement indoors use a high shutter speed, low aperture, and a higher ISO.
Don’t forget the background can be just as important as the subject. Take a moment to consider your focal point, and determine whether the backdrop is enhancing or distracting your shot.
PRO TIP: Focus the lens on your child’s face and eyes because their bright expression will be the most memorable focal point.
Trick Shot
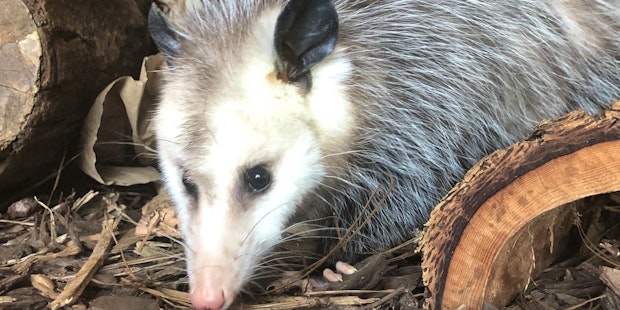
Some of the Museum’s animals’ habitats are behind glass. The trick here is not to capture the glare or startle the animals on exhibit. Assuming you’re not travelling with your off-camera flash that you can point at a wall or ceiling to bounce the light, the next best thing is to zoom in for a tight shot.
Also try testing the angles, sometimes a reflection on the glass can produce surprisingly interesting results and add a layer of depth to an otherwise ordinary image.
PRO TIP: Try Butterfly Pavilion. There is nice soft natural light with no need for a flash, most of the time. The lush environment is beautiful and allows for a variety of angles.
Manners Please, Spit Spot!
When shooting in a public space, respect is key. For many reasons your fellow visitors may not want to be in your shot (even in the background).
Try placing your subject in the foreground to allow others in the shot to fall out of focus in the background. If you feel stuck in a group, get creative – for example crop tighter on your child’s hands while they are participating in an activity.
You also want to be mindful not to block access to the exhibits or hold-up a line. While focusing on your photo remember you have people all around you – most of them only knee-height so watch for small toes when you’re backing up.
PRO TIP: Don’t be afraid to quickly and confidently get your shot. You can always be patient for the right scene, but let people pass if they need to and communicate with the other guests kindly.
Fake It ‘till You Make It
Whether using your phone or a fancy camera, know your equipment so you’re not restricted by it. Don’t waste time and miss your next great shot scrolling through filters or adjusting settings.
And, don’t be so quick to delete; it’s easy to trash what you think doesn’t look good today - but a year or two from now you may rediscover it as a treasure. Maybe you’ll notice something new or simply see something that only time passing can reveal.
PRO TIP: When you enter a room ask yourself, how should I set my camera settings, flash, and body position to best capture my subjects in this space? Eventually, with practice, you’ll be able to make your lighting and in-camera framing decisions even before you bring the camera up to your eye.
Insta-worthy Settings
- Nooks and crannies along Paw Paw Nature Trial
- Live animal encounters including alligator feedings
- Butterfly landings (on plants and people) in Butterfly Pavilion
- Peetie’s Place for close-ups
- Fort Wild using the best props from nature

- Written by
- Discovery Place Nature